---
title: "Publishing an Experience"
description: "Make an Experience available in your app."
search:
tags: ["Features"]
keywords: ["go live", "remote update", "schedule launch", "publish without an app release"]
---
Publish an Experience to make it available in your app. You can put a new onboarding flow or paywall in front of customers as soon as it's ready, or schedule it for a later date. Once your app is integrated, these changes don't need another app release.
Publishing saves a version of the Experience. You can carry on editing the draft afterward; customers keep receiving the published version until you publish again.
## Publish a version
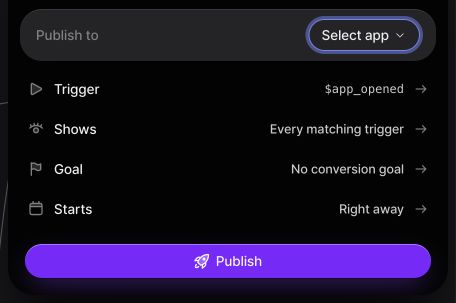 Choose the app, delivery rules, optional goal, and start time in the publish panel.
1. **Choose your app**
Open the Experience, select **Publish**, and choose the app that should deliver it.
2. **Set delivery and measurement**
**Trigger** is the event or condition that starts a Journey. **Shows** describes the audience and how often customers can enter. **Goal** is the optional outcome you want to measure, along with the time allowed for it to happen. Click a row to change that setting. [Learn more about triggers and goals](/docs/guides/delivery).
3. **Publish the version**
Choose a start time, then select **Publish**. If something still needs to be configured, such as a missing trigger or an incomplete path, the panel explains what to fix before you can continue.
## Schedule delivery
### Start time
For a new Experience, click **Starts**. Choose **As soon as it's published** to make it available when the build is ready, or **At a time I pick** to enter a start time.
A scheduled Experience is built straight away. Nuxie waits until your chosen time before making it available, so you can prepare a launch ahead of time. Customers still need to match the audience and trigger before it appears.
### End time
Click **Set an end** to stop showing the Experience at a particular time. This is useful for a limited-time offer or a survey you only want to run for a week. Choose **No end** to keep it available until you pause it.
## Publish status
The panel moves through **Queued**, **Publishing**, and **Published** as Nuxie prepares the version. When it reaches **Published**, the Experience is available according to its schedule.
If you're updating an existing Experience, the live version continues running while the new one builds. A failed build leaves that version in place. Open the error details, fix the Experience, then select **Retry** or publish the corrected changes.
**Open Experience** takes you to the published Experience's details, where you can browse versions, Journeys, responses, and Experiments.
## Pause and resume
Click **Pause** in the publish panel to stop new delivery. You can return at any time and select **Resume** to make the published Experience available again. Its draft and published history stay in place.
If you only want to pause a test within the Experience, use the [Experiment's Pause control](/docs/guides/experiments#start-pause-and-resume). That sends new arrivals through the control variant while the Experience continues running.
## Connect your app
After publishing, open **Connect your app** to get the app key and trigger. You can copy setup instructions for your coding agent or follow the manual integration. Each platform's installation steps are in its [SDK guide](/docs/sdks).
The panel shows **Connected** when the SDK reaches Nuxie and **Shown** when the app presents the published Experience. [Testing in your app](/docs/guides/testing-in-your-app) walks through that first run. When you're ready to change it, see [Versions and updates](/docs/guides/versions-and-updates).
Choose the app, delivery rules, optional goal, and start time in the publish panel.
1. **Choose your app**
Open the Experience, select **Publish**, and choose the app that should deliver it.
2. **Set delivery and measurement**
**Trigger** is the event or condition that starts a Journey. **Shows** describes the audience and how often customers can enter. **Goal** is the optional outcome you want to measure, along with the time allowed for it to happen. Click a row to change that setting. [Learn more about triggers and goals](/docs/guides/delivery).
3. **Publish the version**
Choose a start time, then select **Publish**. If something still needs to be configured, such as a missing trigger or an incomplete path, the panel explains what to fix before you can continue.
## Schedule delivery
### Start time
For a new Experience, click **Starts**. Choose **As soon as it's published** to make it available when the build is ready, or **At a time I pick** to enter a start time.
A scheduled Experience is built straight away. Nuxie waits until your chosen time before making it available, so you can prepare a launch ahead of time. Customers still need to match the audience and trigger before it appears.
### End time
Click **Set an end** to stop showing the Experience at a particular time. This is useful for a limited-time offer or a survey you only want to run for a week. Choose **No end** to keep it available until you pause it.
## Publish status
The panel moves through **Queued**, **Publishing**, and **Published** as Nuxie prepares the version. When it reaches **Published**, the Experience is available according to its schedule.
If you're updating an existing Experience, the live version continues running while the new one builds. A failed build leaves that version in place. Open the error details, fix the Experience, then select **Retry** or publish the corrected changes.
**Open Experience** takes you to the published Experience's details, where you can browse versions, Journeys, responses, and Experiments.
## Pause and resume
Click **Pause** in the publish panel to stop new delivery. You can return at any time and select **Resume** to make the published Experience available again. Its draft and published history stay in place.
If you only want to pause a test within the Experience, use the [Experiment's Pause control](/docs/guides/experiments#start-pause-and-resume). That sends new arrivals through the control variant while the Experience continues running.
## Connect your app
After publishing, open **Connect your app** to get the app key and trigger. You can copy setup instructions for your coding agent or follow the manual integration. Each platform's installation steps are in its [SDK guide](/docs/sdks).
The panel shows **Connected** when the SDK reaches Nuxie and **Shown** when the app presents the published Experience. [Testing in your app](/docs/guides/testing-in-your-app) walks through that first run. When you're ready to change it, see [Versions and updates](/docs/guides/versions-and-updates).